Skewb Ultimate Algorithms
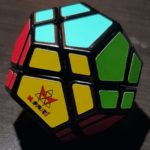
 I grabbed this little guy while in New York and, it being a Skewb variation, I quickly ran into troubles. Not quire sure what’s up with these friggin’ things, but my brain breaks a little bit, particularly this dumb dodecahedron. It didn’t help that after getting a few steps in, I kept getting confused by orientation and the tutorials out there leave a bit to be desired. Not knocking their content – but they’re not too organized. Anyhow, here’s my solution, which will likely require some tweaking before I forget how it’s all done. That’s kinda silly though, as it only really requires the same one algorithm all Skewbs need. R’, L, R, L’. You can reverse it (L, R’, L’, R) for step 2.
Step 1: Solve an X
 This isn’t so bad, though sometimes moving an item out of the way takes a second. This should really be intuitive, but worst case, you might have the piece in the correct spot but not oriented.
If so, move it up to the opposite side. If moved to the right, rotate counter-clockwise, if on the left, CW. Then bring it down and fix the initial turn. Note, if the color you want is facing up when starting this, you’ll have to do this step twice. You can situate all four without breaking one another. This is the easiest step and even if you mess it up, it’s easy enough to fix before moving to step 2.
Step 2: Position remaining centers
This will swap the top and front centers as well as the left and the right. You’re going to use the X you’ve just solved as a starting point for the bottom layer: hold that with your thumb on the bottom. As these centers can have a vertical or horizontal black line (between stickers), it’s easy to get the orientation messed up. However, just keep that thumb on the bottom X as a starting point.
Now, if you’re smart enough, you can plan this out. I, on the other hand, just keep bringing the top piece down to its correct spot (and messing up the rest in the process) until everything is right. Don’t worry about orientation – just getting them in the right spot. You’ll know which algorithm to use based on its upper-level orientation. If the piece you need is on the left face, start with a R’ to bring it to its position. If on the right, start with L. This takes a few tries, but it’s easy.
Step 3: Orient top-layer X
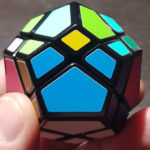
 Still using your bottom facing down, you now have 4 corners correctly positioned and oriented and now your goal is the remaining 4. This can be a pain. Figure out the top-layer colors (here they’re pink and green) and you want there to be two on one face. In this photo these stickers are close, but it could be on the other side where they are farther apart. (Close = they’re adjacent to a horizontal face, far is if they’re adjacent to a vertical face) These can be any combination of those colors too. G,G/P,P or how it is here, one of each. You’ll put these on the left side and rotate the puzzle clockwise (if looking from the right) so that the bottom piece (thumb still on it!) is now the crossroads for this algorigm.
Doubled algorithm this time: R’, L, R, L’ (x2).
If you have no doubles, which is likely, find one sticker you want. If it’s on the left, start with the R’ version of the algorithm and vice versa. I believe this should consistently give you a usable pair.
Step 4: Orient remaining centers
 The very same algorithm will be used to rotate centers. This will flip four centers: U, F, L and R. If you only have two, you’ll be doing this algorithm twice – by fixing one and breaking three others (3+1=4).
Get the four centers U, F, L and R as mentioned and rotate up slightly. You will be performing this algorithm on a properly-oriented side as shown here. Make sure the top and front centers are part of the algorithm (sometimes I do this and my F layer is on the bottom – ensure that it’s part of your algorithm!) Do the same algorithm 6x. Every so often you will have four mis-oriented centers in a row and not a plus pattern. Despite having four, your goal, you still have to perform this step repeatedly. Use your intuition to figure out which to fix so to prep yourself for a proper final step.
Good luck!